 I recently made Solaire’s tabard for a friend; it’s a great project if you’re just starting out with sewing and/or cosplay. Here’s how it’s done!
You will need:
- About 2 yards medium- or heavy-weight white fabric. Pick something from the bottomweights section that isn’t shiny or too textured. Quilting cotton, which I use in a lot of costumes, is likely not heavy enough for this. (Remember to pre-treat your fabric by washing it first!)
- Scissors
- White, red, and yellow thread
- About 1 sq. foot each of red and yellow felt (casual mode) or quilting cotton (Dark Souls mode)
- Some fusible web and tear-away stabilizer
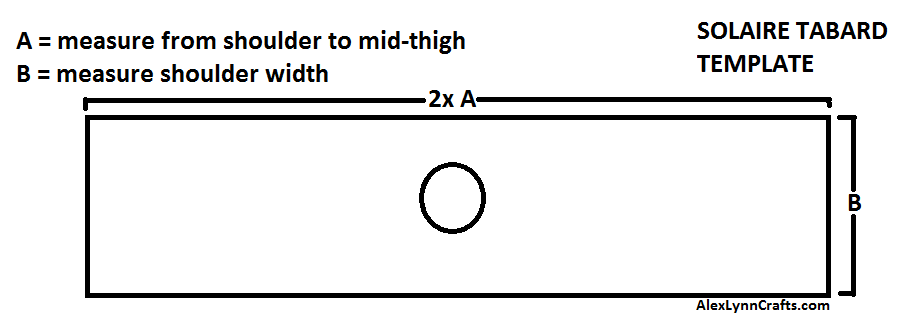
First, measure from your shoulder to about mid-thigh, however long you want the tabard to be. Leave a bit extra if you’re going to be distressing the bottom. This will be measurement A. Also measure from shoulder to shoulder (measurement B).
 Cut out a piece of white fabric that is 2 x A long and B wide. In the very center, cut out a circle that is big enough to fit your head through comfortably. Hem the long ends and the neck hole.
All that’s left is to make the sun. Print out a picture of the sun crest to use as a pattern. For the tabard I made, the crest was about 11″ by 11″, and I needed to print out each half separately, then tape the pieces of paper together. Cut out the sun along the ray lines. Pin the pattern to your red fabric and cut out (optionally, trace with chalk or a disappearing ink marker first). Now cut the circle out of the paper pattern, pin it to your yellow fabric, and cut that out.
This is the part that will differ slightly depending on what kind of fabric you’ve chosen for the crest. Iron your fusible web to the back of the red part of the sun, peel off the backing, then iron it to the tabard in the center of the chest, about 4 inches down from the neck hole. If you’re using felt, you can just sew a straight stitch along the edge of the red piece to hold it down (this is recommended for beginners). If you’re using quilting cotton, use a zig-zag stitch set to the shortest length all the way around the wavy lines of the sun rays, covering up the edges of the fabric. Then do the same for the sun piece, ironing the yellow circle to the center of the sun and sewing down the edges. For more detail on applique, check out this What the Craft tutorial.
Draw the face on the sun using a fabric marker. You may want to draw it in fabric pencil first.
The tabard is almost done, but it likely looks way too clean and new. The last step is distressing! Use sandpaper to make the bottom edges look tattered. Beat the tabard against some rocks, put it on and roll in some dust. Get it looking like it’s seen a few battles.
And that’s it! Add a belt and now you can praise the sun, or whatever.
