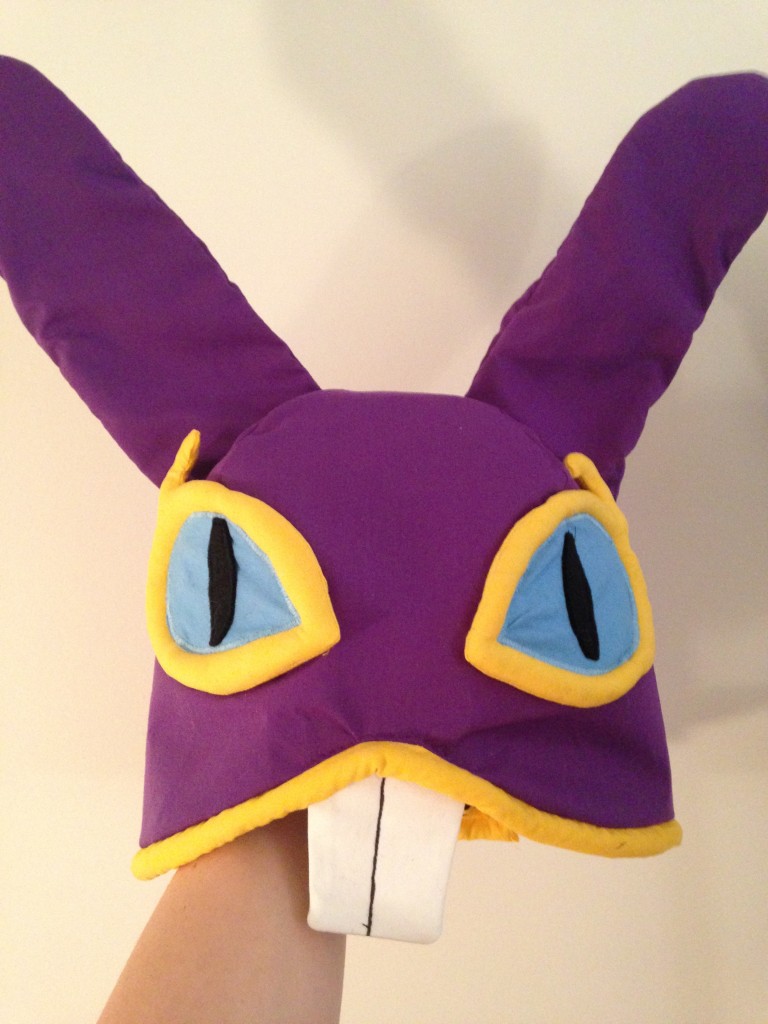
The last and most important piece of a Ravio cosplay is his hood (or hat, whatever you want to call it). This is the piece that makes what looks like a pretty simple costume into something a bit trickier, so I hope this is helpful to other Ravio cosplayers out there.
For fabric, I used the same purple cotton as the robe for most of it. I picked up some yellow and light blue cotton for the eyes, and white for the teeth. I used black felt for the eye pupils. In addition to the fabric, I used both normal and heavyweight fusible interfacing, some jewelry wire (18 gauge, I think), fabric glue, polyfill stuffing, and upholstery cording.
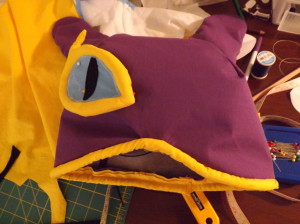
To make the body of the hat, I followed this tutorial for a fleece hat, with modifications. Since the hat actually needed to cover my face, I added about 5 inches of length to the bottom of the pattern, and instead of measuring around my head I measured loosely around my face at the level where I wanted the hood to end. I chose this tutorial because folding the fabric over and only sewing the curves would keep the “face” of the hood from being bisected by a seam. After cutting the piece out of fabric, I cut the same piece out of the (normal thickness) fusible interfacing and ironed it to the wrong side of the fabric. The interfacing lets the hood keep its round shape. After that, I sewed the hat together.
Next, I chose which panel of the hood I wanted to be the front and trimmed the bottom into the upside-down V shape where the “mouth” of the hood is. Then I made the yellow trim using the yellow cotton fabric and the same upholstery cording I used for the belt, and sewed it to the hem of the hood all the way around.
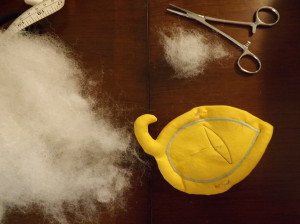
 One of the most difficult parts of the entire costume was the eyes. I did not want to do straight applique, but wanted to get the three dimensional effect like I achieved with the belt. So to make the eyes, I cut out two egg-shaped irises out of the light blue fabric, and two pupils out of the black felt, and attached them. Then I cut four outer-eye shapes out of yellow fabric, sewed two of them right sides together, then cut a hole in the center and turned them rightside out. Then I satin-stitched the blue iris to the yellow outer eye. What was tricky was cutting two slits into the back of the yellow part of the eye, stuffing the thin tubes with polyfill, then closing up the holes with a ladder stitch.
Of course, the ears were also tough. I made the ears out of the purple fabric, and then I cut two slits on either side of the top of the hood wide enough for the ears to fit through and pinned the ears in place. Next, I made a wire frame for the ears, sort of following this tutorial. One thing I did differently from the tutorial (which I maybe shouldn’t have!) was I made the frame and placed it in the hat before sewing the ears in, rather than trying to fit the wire through the stitches. I admit I did break a needle sewing the ears in.
 After putting the ears in, I glued the eyes on with fabric glue, let them dry, then placed a few stitches at the corners for security. I know I should have ladder-stitched all the way around instead of gluing, but it was deeply tedious and difficult. I’m sorry, sewing gods~
Anyway, after all of that, the teeth were easy. I just cut out two tooth shapes from white fabric, ironed some very thick interfacing to one of them, sewed them together and turned it inside out, then stitched a black line down the center. I sewed the tooth in place by hand (for real this time!) using a backstitch.
Now how the heck am I going to take this thing on a plane?

Hi wonding if you have a completed picture of the Ravio costume? Would like to have ago at making one but wondering how it would all look like together with the robe
Yes, I have a photo gallery of the finished costume here: https://alexlynncrafts.com/cosplay-galleries/ravio-link-between-worlds/
how did you make the plush?
I developed a pattern and made it out of fleece. I’ve made the pattern available here: https://alexlynncrafts.com/2014/03/pattern-sheerow-from-the-legend-of-zelda-a-link-between-worlds/
Any tips on making the eyes have holes so i can see through them? Sight seems important.
I didn’t make mine see-through, personally; I just walked around with it up and pulled it down for photos. But if you wanted to make them see-through, you could use white and black mesh for the eyes instead of fabric. After you sew it to the hat, cut through all the other layers to make eye holes.
I’ve been working for weeks on this Cosplay and I am so hyped to get it finished! Yours has really inspired me! Thanks so much!