This tutorial is for Ceri, who requested twirly skirts for toddlers, but this tutorial will work for anybody. Twirly skirts for all!
There are two types of skirts I enjoy making the most, and they both have a high twirl factor: circle skirts and tiered petticoat-style skirts.
Circle skirts are a great first sewing project because they are very easy. They’re literally just a circle of fabric with a waist hole in the middle, and a waistband sewn on.
You will need:
- Some paper for drafting a pattern
- Fabric (exact amount depends on measurements) — I recommend a doubleknit jersey — it’s soft, it stretches, you don’t need to hem the bottom, and it’s heavy enough to wear on the bottom.
- Some elastic (optional)
- Coordinating thread
First, measure around your (or your toddler’s!) waist and decide how long you want the skirt to be. Now you can use circleskirtpattern.com to instantly find out the measurements you need to draft your pattern–just plug in your waist measurement and the skirt length. (If you’re wondering about the last field, most apparel fabrics come in 60″ wide, and most quilting cotton comes in 45″ wide.) The site also tells you how much fabric to get! Amazing.
To make the pattern, you will need a large piece of paper. Fold it in half twice and mark the corner that has both folds–this will be the center of the pattern. From the corner, measure out along both edges the yellow measurement from the website. Draw a curve between these two points (double-check that every point on the line is [yellow] distance away from the fold corner). Now do the same for the purple measurement. Cut the paper along both of these curves, unfold the paper, and you now have your circle skirt pattern.
After your fabric is cut out, you just need to make a waistband. Cut out a strip of fabric that is 2x the width that you want, plus 1″ (for seam allowance). The length of the strip should be the same as the waist measurement, if you’re using a non-stretchy fabric, or 2″ less than the waist measurement if the fabric is stretchy. Right sides together, sew the narrow ends of the strip together, forming a loop. Fold the strip over, wrong sides together. With the skirt right-side-out, pin the waistband to the waist opening, right sides together, matching up the raw edges. Sew all the way around–if you’re using a stretch fabric, use a stretch or zig-zag stitch, and you will have to stretch the waistband a bit to fit. Iron the waistband up.
If you used a woven fabric, or if the knit fabric is too stretchy and the skirt won’t stay up, you can use elastic to make a sturdier waistband. Stretch a piece of elastic so that it fits comfortably around the waist, then cut it. On the skirt, snip a small hole in the inside of the waistband and use a safety pin to thread the elastic into the waistband. Once the elastic goes all the way around the waistband, pull both ends out of the waistband and sew into a loop. Sew up the hole with a ladder stitch and you’re done!
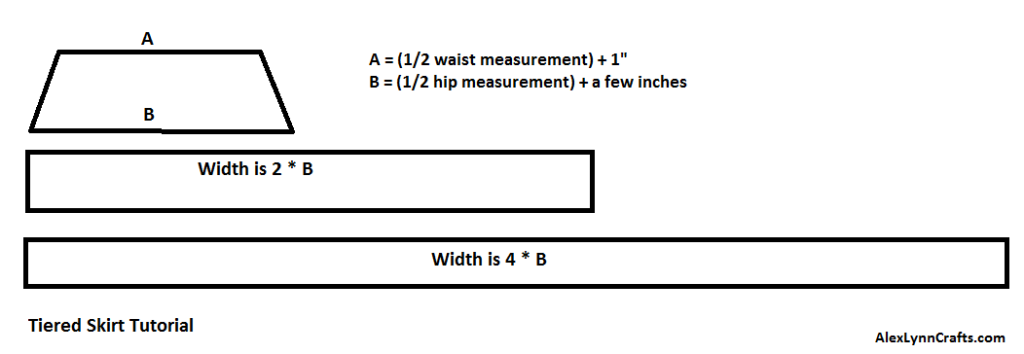
Tiered skirts are a little more involved, but are very fun and cute. They consist of a trapezoid-shaped “yoke” and any number of long rectangles of fabric that are gathered and sewn together. Here is a basic template for a tiered skirt.
 The length of the skirt is up to you. Once you determine the length, divide it amongst the different tiers. You can make each tier the same width, or make them progressively narrower, or alternate wide and narrow, or any other combination.
You will need:
- About two yards of fabric, depending on measurements — you can use knits or wovens for this skirt. Try mixing printed cottons!
- Elastic
- Lace, ribbon, or other trim — optional. Rickrack would be a cute trim on a kid’s skirt!
Cut out two of each piece in the template (if you’re using a non-stretchy fabric, you may need to add a few inches to the waist measurement so that the skirt can fit over the hips when it is put on). Take the shortest rectangle piece, gather one long side, and sew it to the wide edge of the yoke, right sides together. Gather the longer rectangle and sew it right sides together to the shorter rectangle. To gather, use a hand sewing needle and sew a loose running stitch down the edge of the fabric, then slide the gathers together on the thread. Another method is to take some heavy duty thread and use a sewing machine to sew a zig-zag stitch on top of it, then slide the fabric down the heavy duty thread. Or, use a sewing machine ruffle attachment. Repeat for the other three pieces.
This is the point where you sew on your decorative trim. For my skirt, I sewed some lace trim over the gathered seams. When you’re happy with how it looks, place both sides of the skirt right sides together and sew down each side. Turn right-side-out and add a waistband as above. And you’re done!
